
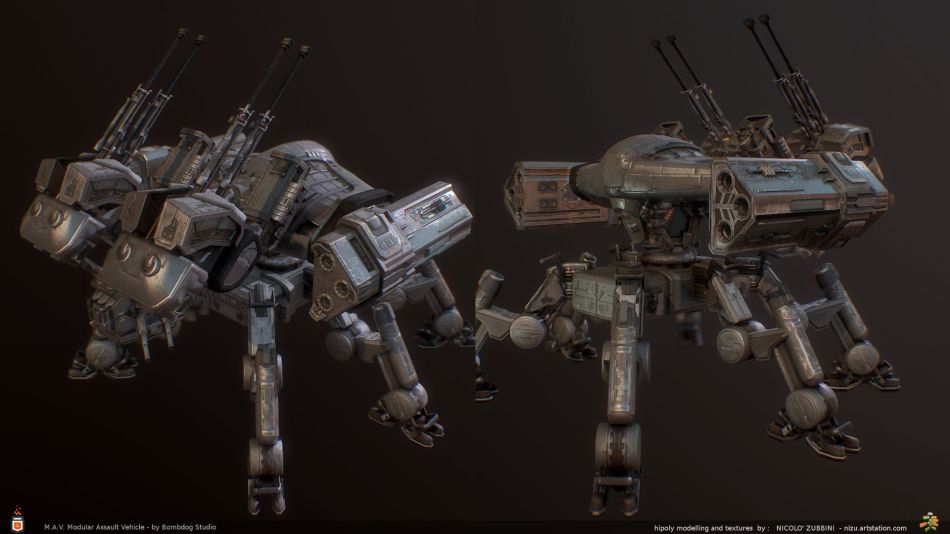
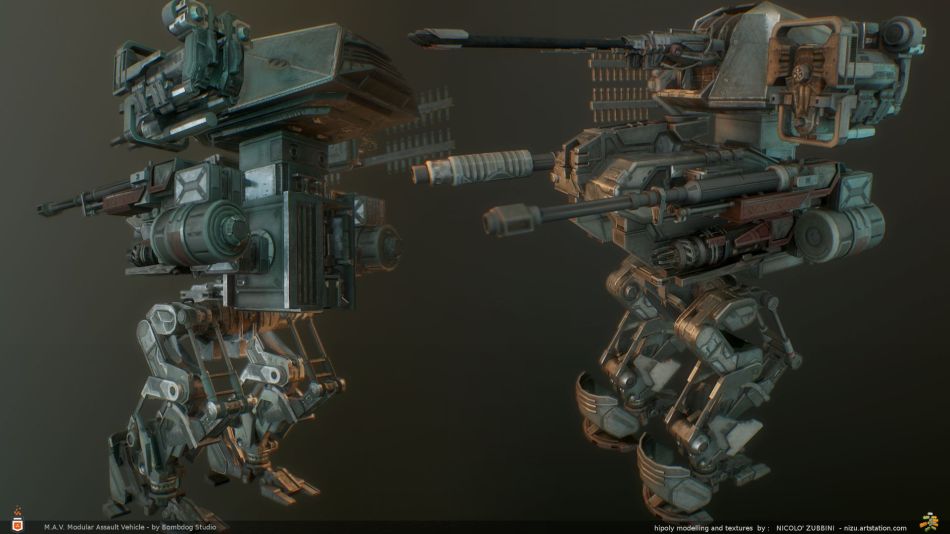
MAV : Renders


I’ve recently worked on some ‘Beauty shots’ (promotional renders) for MAV ‘Modular Assault Vehicle’ by Bombdog studios, using the mech parts and environments i’ve modeled and textured in the past year (always starting from the concepts and specs i receive, most recent parts i modeled from scratch, others starting from concept hipoly models by the main dev. Chad Mauldin) .
These images are rendered in Unity 5, so technically realtime, but at 4k res, with very high general settings and a bit more postfx than would be ‘sane’ for actual in-game use. Models and textures though, are the same used in the game.
One of the coolest (and heaviest) effects in this kind of render is volumetrics, here i used ‘Fog Volume 3’ . An alternative to the whole setup would have been the new ‘Eevee’ viewport/realtime/render engine in dev. for Blender 2.8, which i’m sure would have been more fun for volumetrics, since you can make actual sims of fire/smoke systems in Blender and then render them with Eevee in near-realtime, with accurate volume shadows too. I’m really looking forward to Eevee, but since 2.8 is still alpha and this was production work, i didn’t risk messing up the schedule.
Unity’s fog volume is more limited to primitive volumes and a general cloudy-noise ( understandably, it’s already heavy as it is for use in ‘proper’ realtime ) In any case, having a fog/smoke you can shape is a great tool to hide or reveal more parts of the shot and balance clutter and contrast.
One thing i’m still working on, is the fact that rendering stills in unity means having many lighting types going on at once : pure realtime direct light and shadows, baked GI and the realtime GI. It’s great to be able to bake something and have still 2 out of 3 of those ‘tweakable’ after, but you have to balance them, for stills is often good to use the static baked light heavily since it allows softer shadows and ao, but it’s the less ‘interactive’ part.
There are more of these renders, but as usual, i only post here assets already published in the game updates 🙂
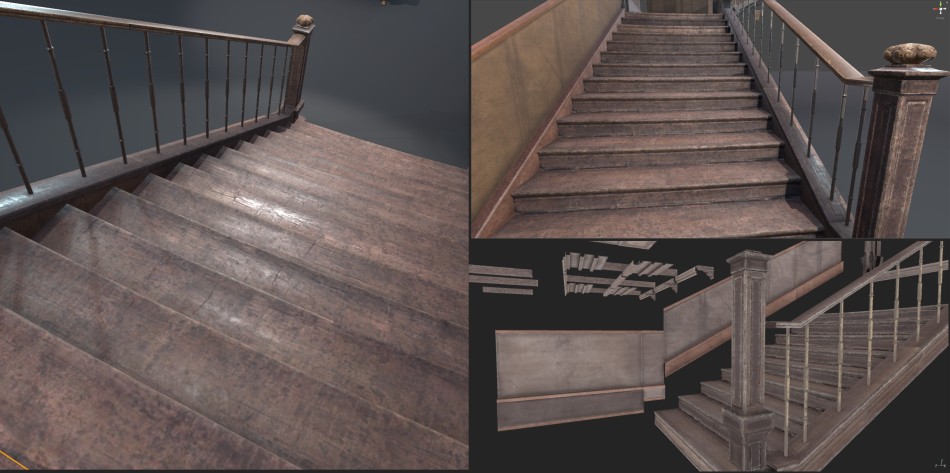
MAV: Buildings and environments
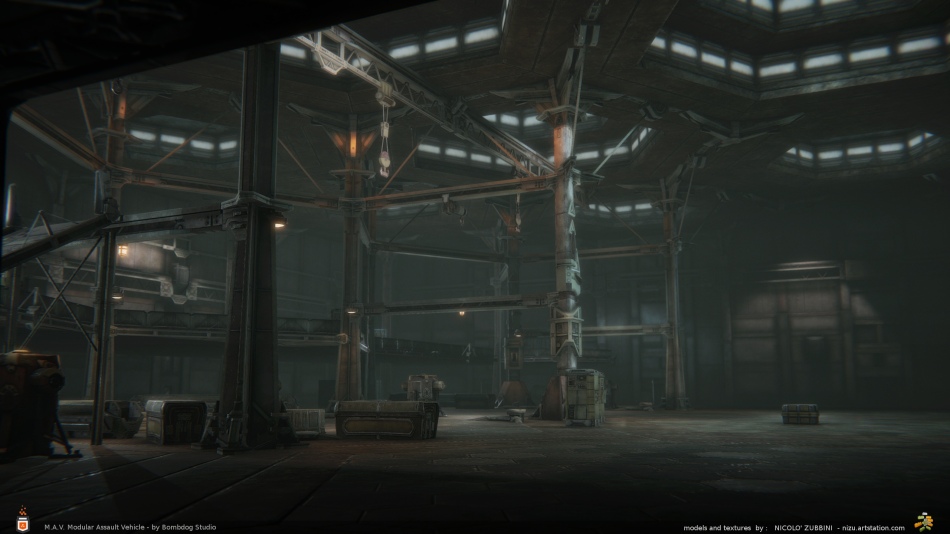
So much to post from the past months! Starting with buildings and environments for the game ‘MAV’. Above : the garage / game lobby, below : 2 sets of buildings for the levels:
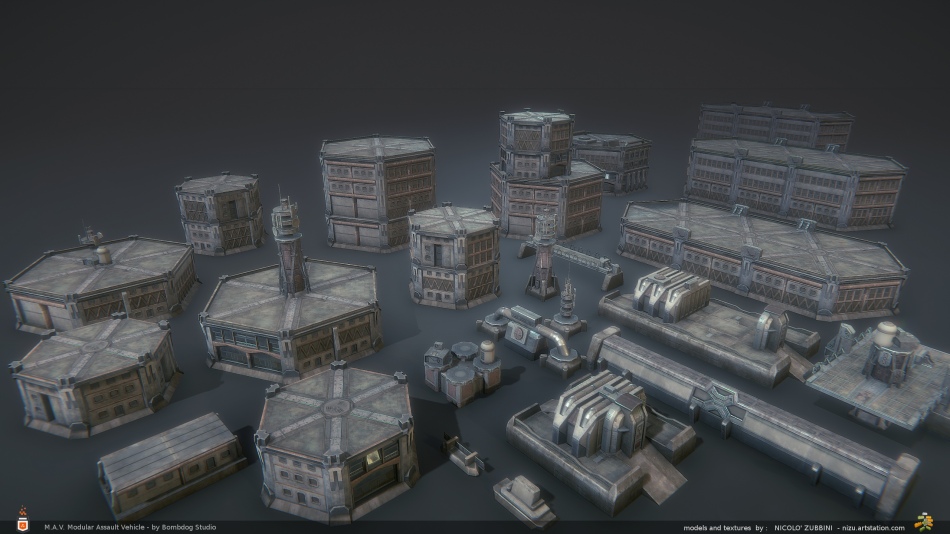
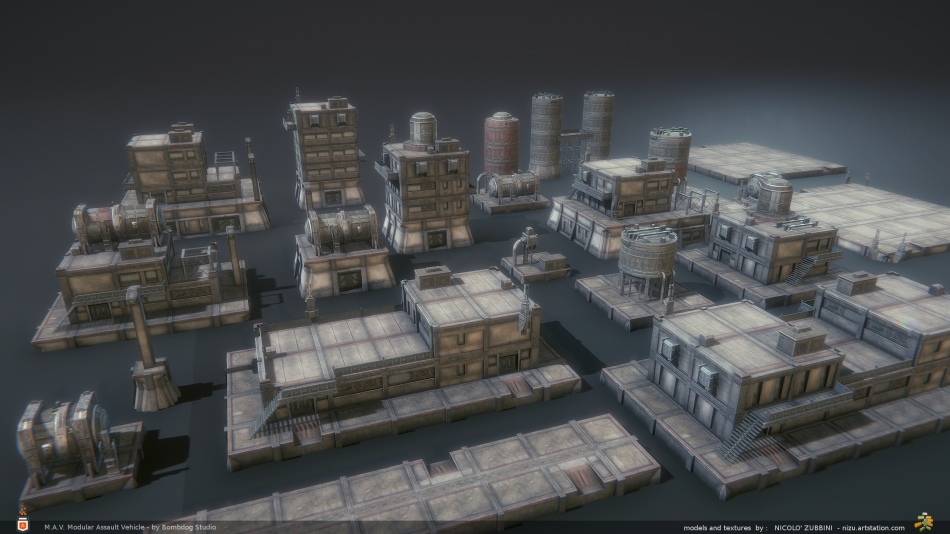
I always enjoy the architecture part, the style ref. was 20th century ‘Brutalist’ buildings, and it fits well with the concept that these buildings are on another planet and in the future, but not necessarily all shiny, high tech and unfamiliar , they are ‘normal’ everyday industrial or military architecture, even if from a different time and place.
Workflow is the same as previous sets (Blender+Substance). The screenshots above are beauty shots in Unity 5 ( and some older ones below are Marmoset), also below, some w.ip. images of models and previews in Blender and screenshots from Substance Painter with texture sheets, which show what parts are uniquely textured vs. all the repeats and reuse in the assembled models above .
![Pic[69]](https://nizuvault.files.wordpress.com/2017/02/pic69.jpg?w=950)
Also below, landscape shots of the mountain pass and city levels (Unity 4, using the actual in-game shaders) These are large, open levels to fit the size of player models (M.A.V.s are mechs, 2-4 storeys tall) For the levels, i worked on terrains in Blender and exported to Unity terrain system, textured using S. Designer and used Unity tools for grass and trees.
More posts soon : New mech parts and promotional renders.
![CropperCapture[645]](https://nizuvault.files.wordpress.com/2017/02/croppercapture645.jpg?w=950)
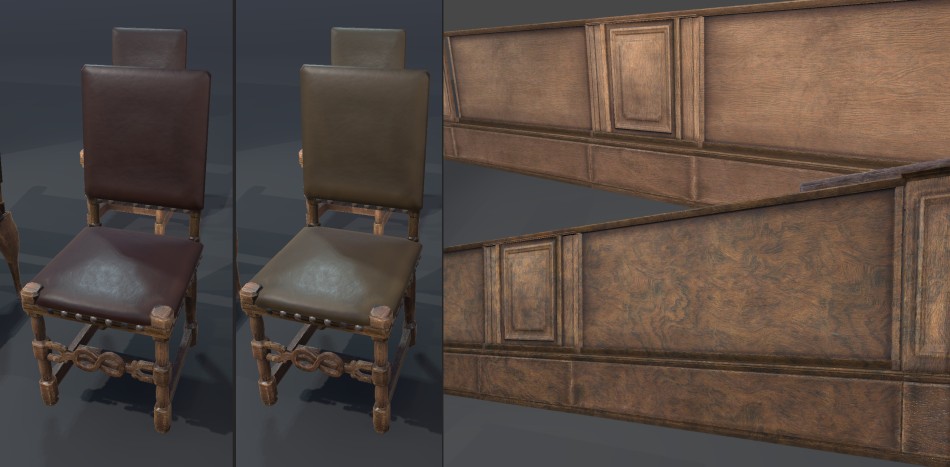
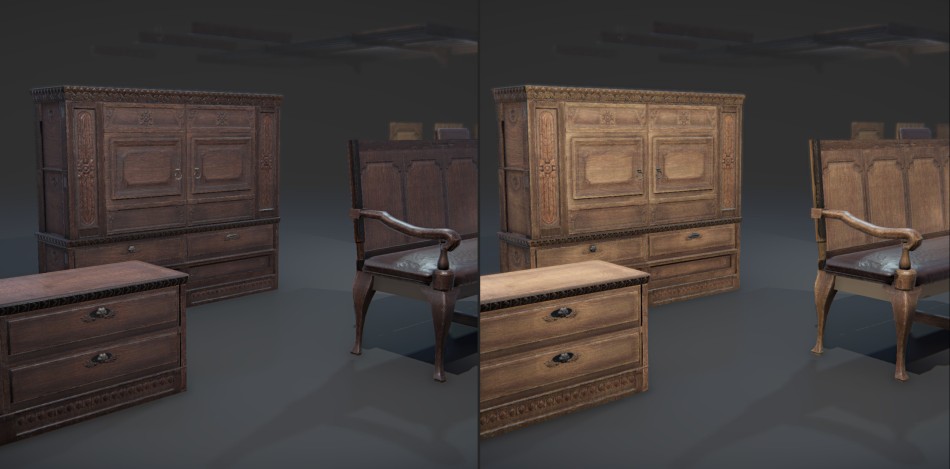
Almighty window : Wood furniture set

These images are from a set of interior furniture models (mostly wood) for realtime render. Made for Rob Tuytel – Model Earth.
The goal with this set was to make efficient models: mostly in the use of textures, and for reuse and expansions of the set: this sort of elements are the basic decorations in interior spaces : chairs, tables, ceilings and wall paneling, they’re everywhere and need variation, but also most parts are basically sticks and panels of wood .. Still, there’s a big difference between just applying a tileable over a more or less refined model of a chair leg , and having a fully modelled hipoly baked and unique textures, with discolorations, dirts and edge effects.
But again it’s .. lots of wood sticks, so i .e. think 1 table : it’s simple, but if you expand the set to 5 types of tables, and armories, etc.. suddenly you realize you’ve dedicated unique texture space to dozens of very similar simple pieces.
I used 2 standard solutions : organizing and breaking down models into small parts, reusing them, keeping track of which are ‘original’ and having hi-polies for them, and making what’s possible modular in size (so a panel can be used both for walls waistcoting and as armory door panel)
This makes every single asset into a bunch of separated objects in Blender, but i keep working on my scripts so i can batch export them as a single mesh to Unity (welding, preparing uvs on 2nd channel for lightmap, keeping moving parts like drawers separate)
The 2nd solution is the use of a base map for dirts and shape-specific effects, and a tileable for the wood grain (possible in standard unity shader, like in the Blacksmith demo)
That also means the base map can use less texture space for some objects (i.e. a large flat wood panel ) and more for others (a detailed capitel with normal map details) While a 2nd uv has constant scale for mapping correctly a tileable wood grain and veineer.
The tileables were made from photo textures, but using also Substance : it was quicker for me to start from photo than procedural for nice wood veins patterns, but ‘packaging’ them as .sbs i could have 3 base types prepared , and in Unity, being able on the fly to still change colors, normal intensity, mixing flat and rough wood patterns.
So in the end you could have a table using the same leg model as a chair , but scaled and with a different tileable wood, making it look completely different, or if something special like a pendulum clock is needed, all the parts in common with a cupboard can be reused (maybe with a different tileable to hide the ‘modularity’ )


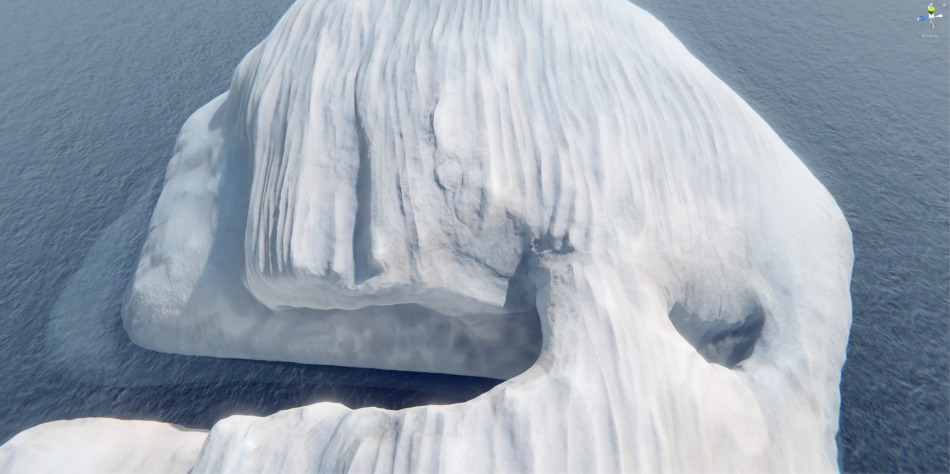
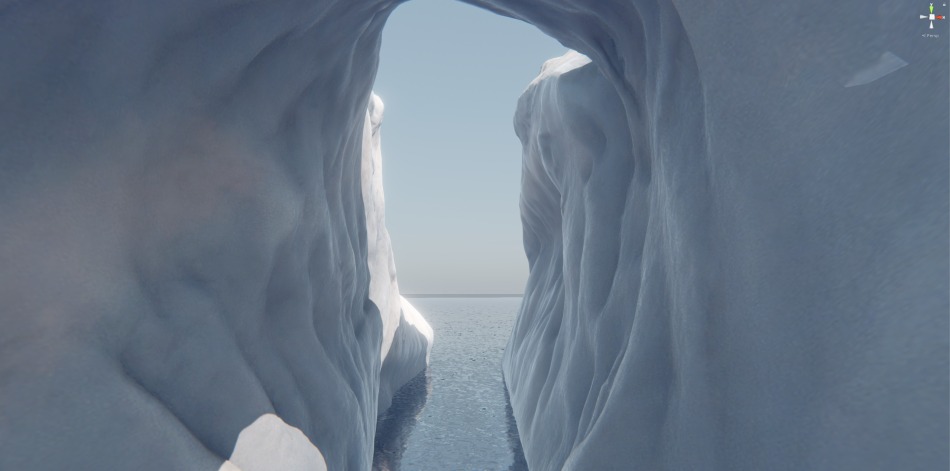
VR environments

Here’s some images of collaborations with Realer ( www.realer.io ) making interactive VR experiences (i worked on the art/assets part).
The 1st is an iceberg model for a vr simulation, walking on a slackline over an iceberg crevasse. The 2nd project is a VR showcase of the architecture and constructive details of an energy-saving building.
As usual modelled in Blender (sculpt from photo refs), textured in substance, lighting in Unity 5, both for use with HTC Vive desktop headset, so for me it was largely the same workflow of usual games and non-stereo render, with some more attention to fps (but only screen-space reflection was in doubt because of its render cost, and about AA, the most recent postfx for unity did a good job, so at least for these projects, i didn’t have to switch to forward render for better AA.
More about the VR interaction on Realer’s site : www.realer.io


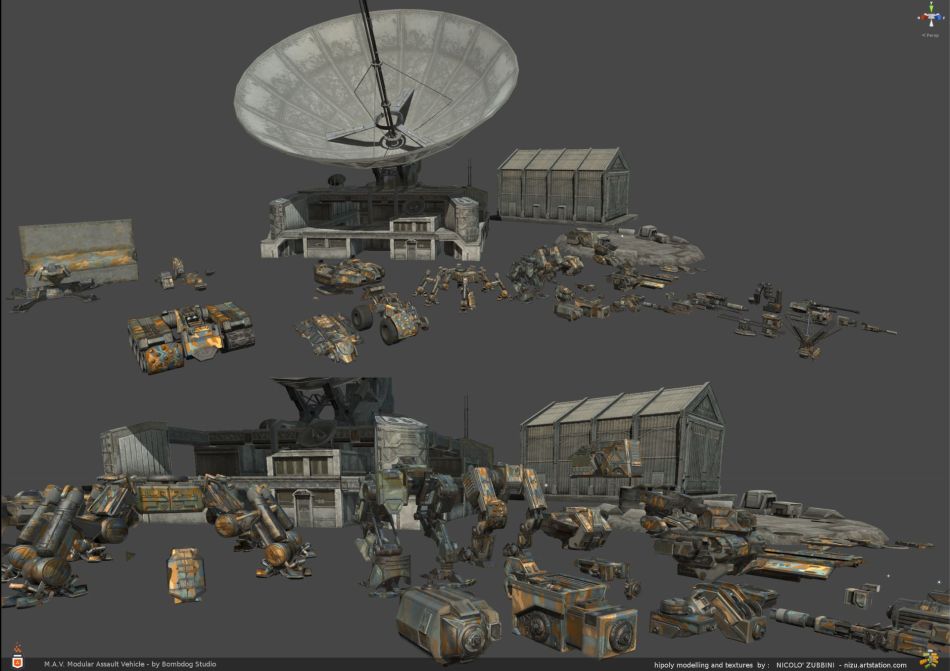
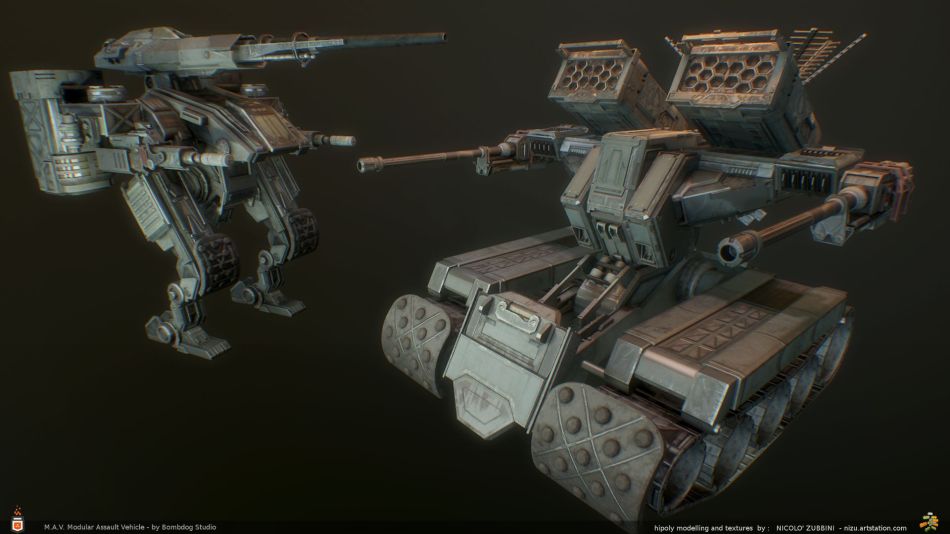
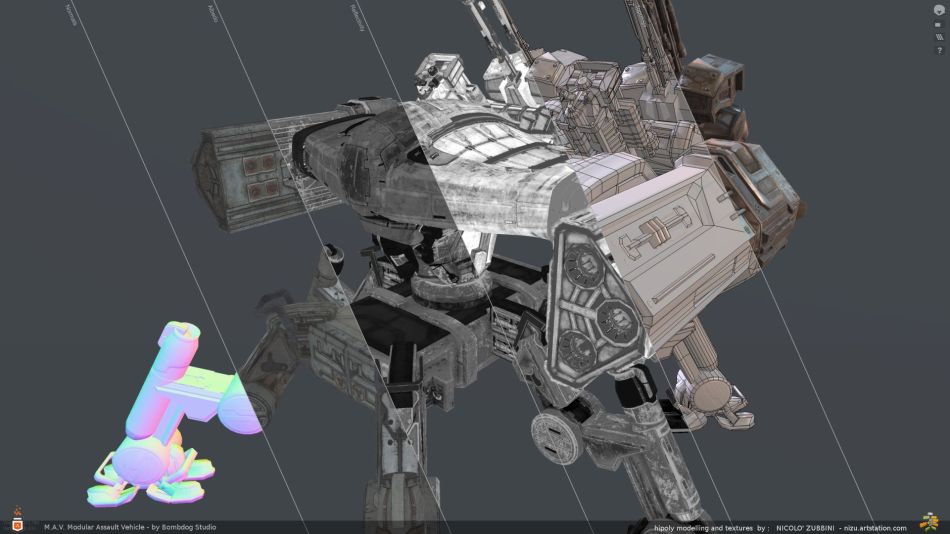
MAV: New parts and env assets
Some new assets, done in the past months, for Modular Assault Vehicle by Bombdog Studios.
Lots more to post as soon as they’re released 😀
Modeled in Blender, textures in Substance, rendered in Unity 5, At this point i prefer results in Unity vs. Marmoset (2, at least) maybe a little less metallic and shiny as i have it set up, but overall pbr reliability and just the easy of shading and lighting in unity 5 (since 5.3-5.6) is great. The actual game is unity 4 and not pbr shaded, but i have started doing some env. / maps work, and that allows to setup reflection maps and lamps to work better for the mechs’ shading too (and luckily the big open spaces in the game mean that light conditions are much more consistent than in i.e. a human scale city level with interiors, so it’s not too time consuming to expose correctly without pbr, hdr, tonemappers and all the fancy stuff) .
Heavy2 cockpit :
![CropperCapture[190]](https://nizuvault.files.wordpress.com/2017/05/croppercapture190.jpg?w=950)
![CropperCapture[197]](https://nizuvault.files.wordpress.com/2017/05/croppercapture197.jpg?w=950)
Thermal systems (mech parts) :

![CropperCapture[174]](https://nizuvault.files.wordpress.com/2017/05/croppercapture174.jpg?w=487&resize=487%2C252&h=252#038;h=252 "CropperCapture[174]")
![CropperCapture[177]](https://nizuvault.files.wordpress.com/2017/05/croppercapture177.jpg?w=946&resize=946%2C491&h=491#038;h=491 "CropperCapture[177]")
Ice environment assets :


Personal Project
![CropperCapture[52]](https://nizuvault.files.wordpress.com/2017/04/croppercapture52.jpg?w=950)
I’m working on a personal project! a small realtime env. (Blender, Substance, Unity)
This was long overdue: some things you only learn on actual projects, working for and with other people, and with budget and time constraints, but after a while i had also a pile of things you don’t get to solve properly in that context.
The updates and info on the scene are on polycount :
http://polycount.com/discussion/186290/
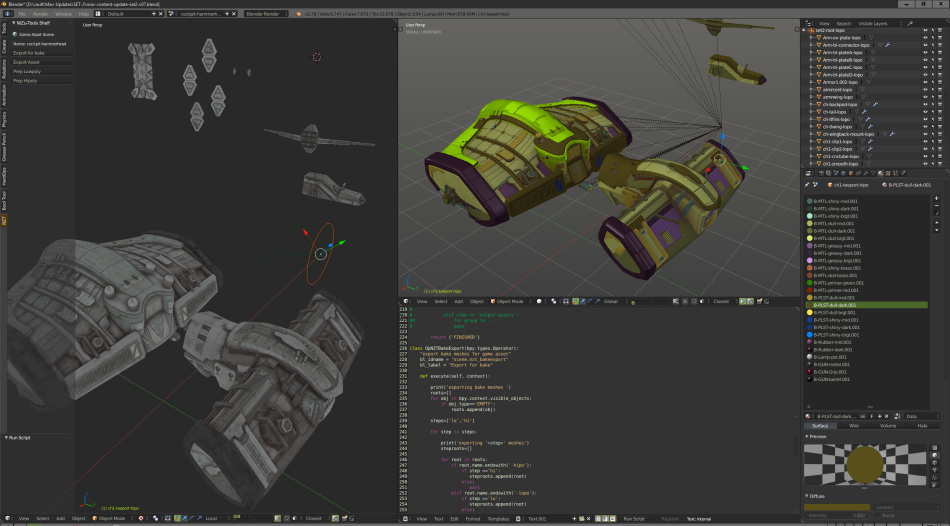
And in particular , in the last year, i’ve been working on some export and workflow tools of my own (i call them ‘python on post-its’ ![]() ) : It’s some batch tools for quicker common tasks of organization and cleanup when creating game assets and environments.
) : It’s some batch tools for quicker common tasks of organization and cleanup when creating game assets and environments.
These tools started as a few macros to rename object pairs for hipoly-lowpoly and quickly going from Blender to Substance, then expanded with some macros for export to Unity (joining objects preserving custom normals, repacking uvs for use as lightmaps .. and few more boring but useful speed ups)
After a while, i had all these snippets lying around , customized with ‘hardcoded’ changes for each project, and at least i want to polish them as ‘internal tool’, organize them so they don’t get lost, but i also want to make them as usable/useful as possible for the community.
I think it’s great how Blender allows artists to make their own tools easily (i’m not a dev or a proper technical artist either) and it has surely saved me time on daily env-art work! But this also means, my addons will never be good code or polished, still this thing will serve its purpose even if it only creates a bit of online discussion about game art tools in Blender, or later a talk at BConf and eventually the best ideas being picked up by proper devs.
Click on ‘read more’ to continue on this topic :
![CropperCapture[56]](https://nizuvault.files.wordpress.com/2017/04/croppercapture56.jpg?w=255&resize=255%2C129&h=129#038;h=129 "CropperCapture[56]")
![CropperCapture[55]](https://nizuvault.files.wordpress.com/2017/04/croppercapture55.jpg?w=255&resize=255%2C134&h=134#038;h=134 "CropperCapture[55]")
![CropperCapture[47]](https://nizuvault.files.wordpress.com/2017/04/croppercapture47.jpg?w=255&resize=255%2C137&h=137#038;h=137 "CropperCapture[47]")
![CropperCapture[54]](https://nizuvault.files.wordpress.com/2017/04/croppercapture54.jpg?w=269&resize=269%2C134&h=134#038;h=134 "CropperCapture[54]")
![CropperCapture[53]](https://nizuvault.files.wordpress.com/2017/04/croppercapture53.jpg?w=269&resize=269%2C134&h=134#038;h=134 "CropperCapture[53]")
![CropperCapture[51]](https://nizuvault.files.wordpress.com/2017/04/croppercapture51.jpg?w=269&resize=269%2C132&h=132#038;h=132 "CropperCapture[51]")
![CropperCapture[49]](https://nizuvault.files.wordpress.com/2017/04/croppercapture49.jpg?w=414&resize=414%2C202&h=202#038;h=202 "CropperCapture[49]")
![CropperCapture[48]](https://nizuvault.files.wordpress.com/2017/04/croppercapture48.jpg?w=414&resize=414%2C202&h=202#038;h=202 "CropperCapture[48]")
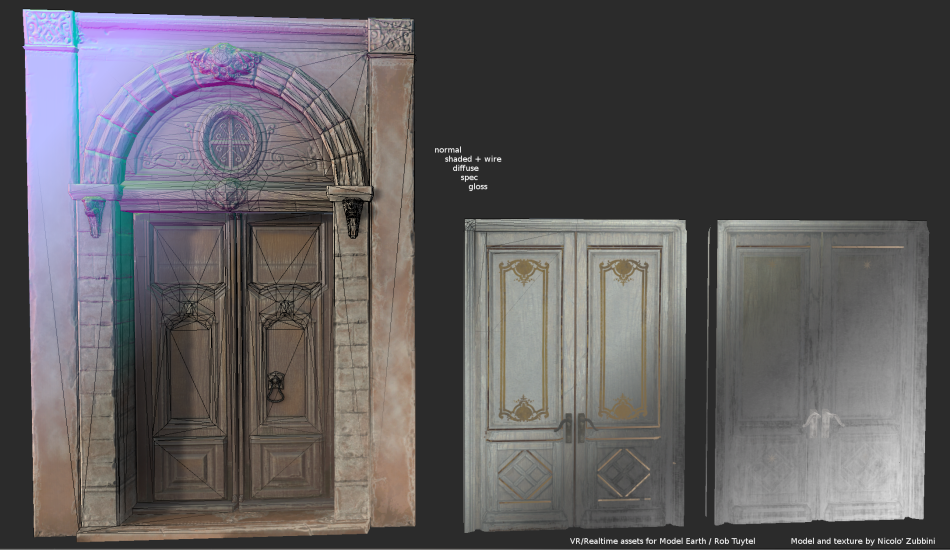
Almighty window, realtime Architectural elements
This is a set of assets for realtime/VR for the project Almighty window by Rob Tuytel / Model Earth.
These were modelled, and sculpted, in Blender, textured in Substance (painter for most, Designer for the tileable sandstone blocks detail) Rendered in Unity 5.
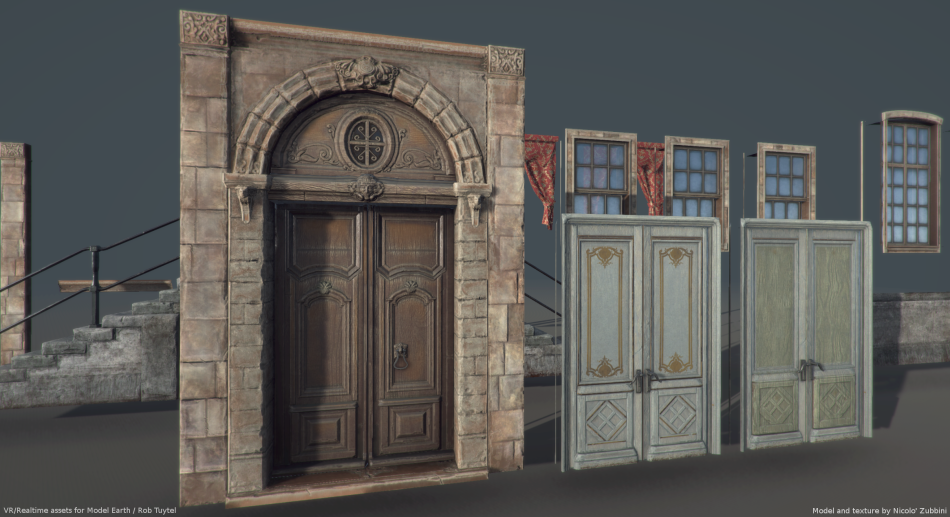
This was an interesting project for the level of detail of models, higher than usual because it’s for 1st person / VR, and in particular a game that will be mostly in confined interior spaces.
I’m a big fan of sculpting for architectural details, even when it’s just chipped edges and scratches, but it is time consuming and so procedural workflows is also something i will try to use more and more (i.e. the inner pillars at the sides of the door are sculpted, the outer ones have a tileable procedural texture, where even normal map is fully in substance)
I used spec-gloss pbr model becaus, while still trying to be pbr accurate, i like to have a bit of freedom vs. the metalness model forcing anything non-metallic to have same spec. level.I also made some simple custom shaders in shaderforge to be able to mix detail maps using : 1- a blend mode that doe not add saturation (mix or color dodge depending on cases) 2-adding spec-gloss texture for the detail too (to get nice and detailed spec on wood veneer)
In the images below : the 4 tall pillars are actually the same 2 : left has detail map of sandstone bricks, right has a simpler grainy concrete. The curtains were made by cloth sim in Blender, realtime model made simply by un-subdividing the detailed mesh 3-4 times (to under 1k tris each) + normal map.
In the last row : sculpt detail, hipoly full view (23 million polys between all sculpted pieces and still a workable scene) with material colors corresponding to Substance mat-id key map, and right picture shows lowpoly (material color correspond to texture sheets in unity) with uv view of one of the 4 sheets.


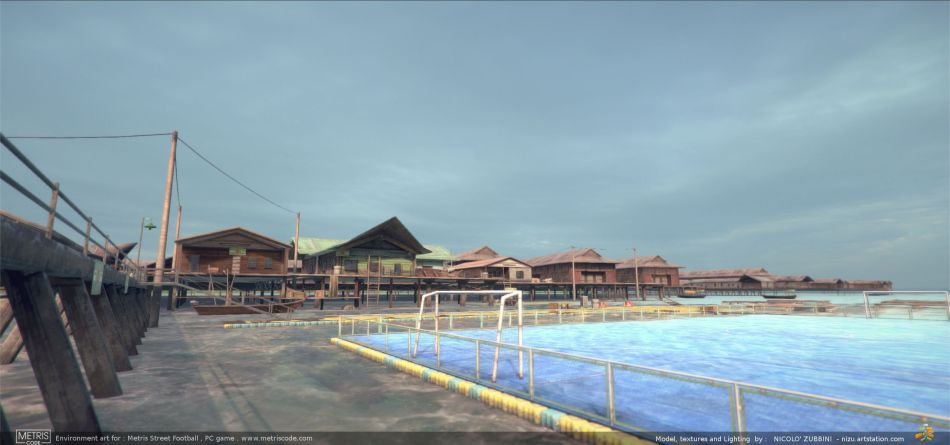
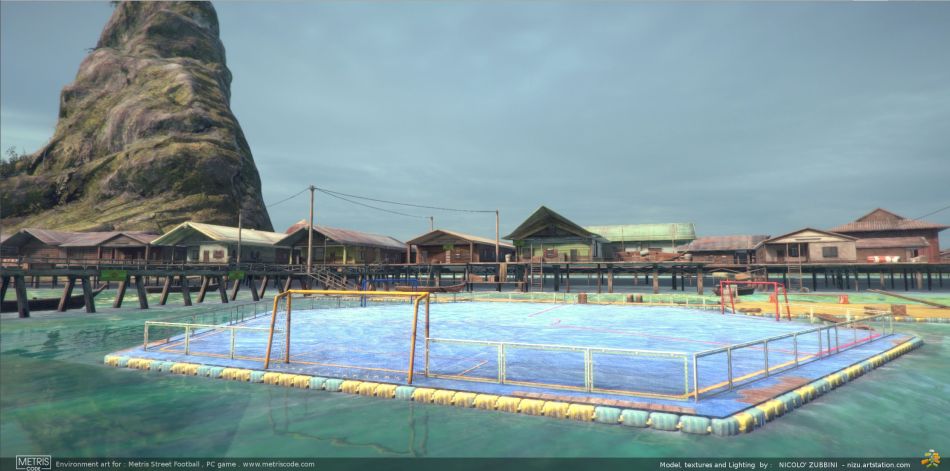
Metris Street Football : Venice Rialto and Thai village environments
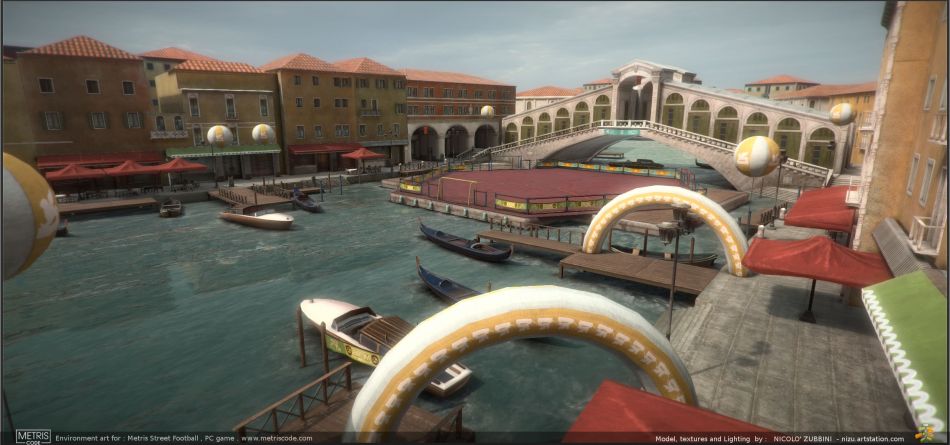
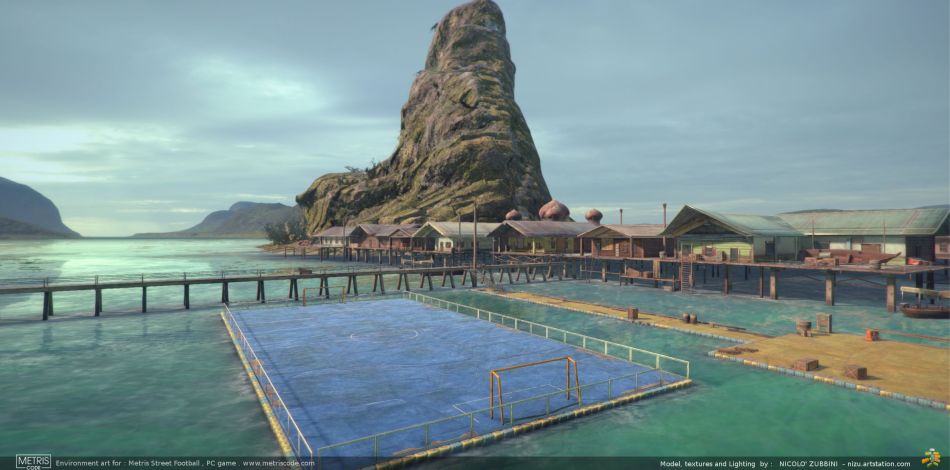
These are the 3rd and 4th environments i made recently for the indie pc game Metris Street Football, by Metris code : Venice Rialto bridge and Thai village.
Specs are same as previously: Unity 5, PC game, current gen level of detail, 1 month of work time each env, modeled in Blender, textured in Substance. With the addition of using Shader Forge for the water and colored buildings in Thai village.
These levels are a bit bigger than previous ones, and the main challenge was to be selective on what assets to make to fill them and have variation, without loosing too much detail on the single item, but of course, luckily, the fixed point of view of a sport arena game does allow to keep props simple, quick and dirty (compared to an fps asset that is !) and still get a good ‘ensemble’ view.
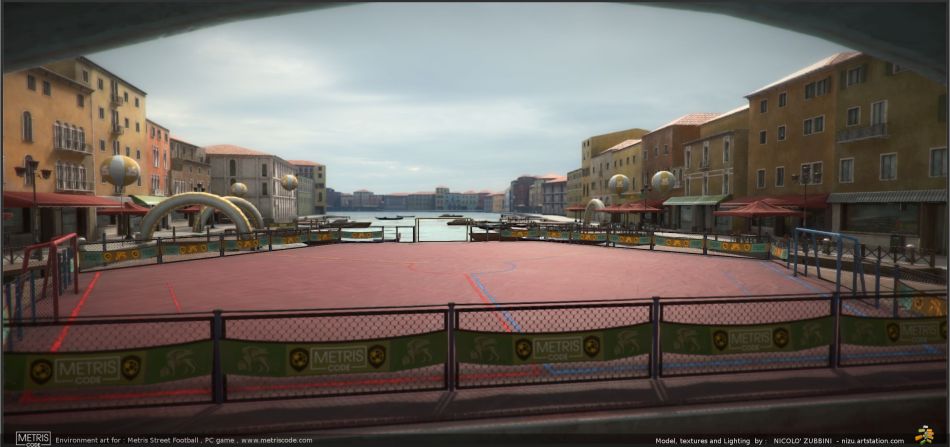
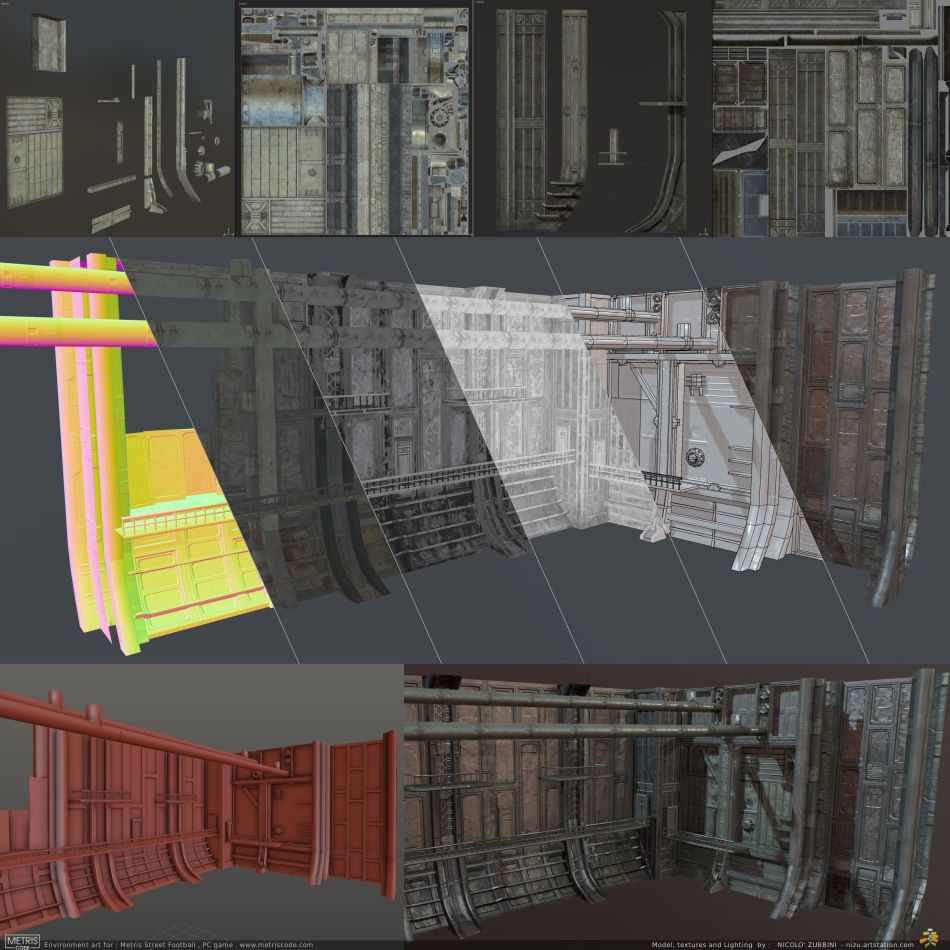
Strictly speaking there’s no LODs in these, but Venice and size of the view of Canal Grande required that the further buildings be less detailed than those just behind the goals, it turned out very quick and effective to put the models of the detailed/hero lowpoly ones in a Blender scene (diffuse textures only in a Cycles material), render front views of 2 canal sides and then retrace low(er) poly shapes over the rendered 2d card. (in gallery you can see also an attempt to use a curved skybox type plane with a rendered background, but the camera has be able to go 1-2 floors high in a sport game replays, so that wouldn’t work at all)
The other thing about the buidlings is visible in left image of gallery: showing the final diffuse, using a brick tiled detail and base diffuse color (unique unwrap) . That’s something i like to work with : seems a straightforward technical thing to overlay a detail on a base, but actually involves a fair bit of painter/photograph eye to pick each time the right blend mode, color and saturation of both maps to combine and whether to use a mask to refine the mix (all of course bound by limits of realtime, even when something like ShaderForge makes it very intuitive to do with its nodes)


The last image in gallery above shows the baked light : static on the left , realtime on the right. There wasn’t a strict need to use dynamic GI for this kind of game, but i think unity’s approach makes a lot of sense in general, blending an advanced and dynamic solution that has low resolution and a simpler, static one that has detail, like soft shadows and contact bounces. This was done just before Unity added an option to add direct light AO to static bake ..which just goes in that direction , but the result is similar (contact shadows here are from a soft baked sun and sky)


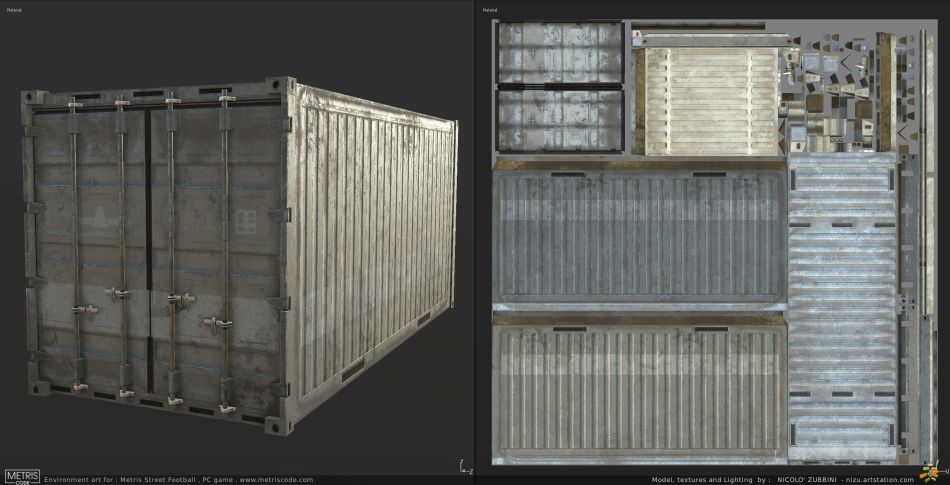
Above some of the models : classic Venice boats, a load of windows doors and other facade details used on the buildings, and the Rialto model : the substance painter view is ..full of holes 🙂 because i didn’t export parts/modules that could reuse textures from other parts But it includes mirrored objects.. never got baking errors from those, and i guess i could setup Painter to show everything but only bake some, but this works fine, only requiring sometimes to do an exploded placement to get better ao (as usual i bake normal in small separate chunks by matching hi/lo poly objects names, but bake ao from everything to give more ‘food’ to procedural materials to make their effects)
Below more screenshots of finished level :


And the other level is Thai village : Venice was done just after and reused the water shader (though changed ..much muddier) This level has a bit less architecture, but also a lot of natural landscape, requiring some special attention to light and shading .
The water shader is technically simple , just some more nodes than a standard material: a base, a single detail reused in 2 scales to get resolution without repetition, a static mask for foam around objects (all animated with texture panning) and a planar reflection from stock unity effects.
It’s always risky to start adding nodes to a realtime material, before you know there’s a ton of them ! but afaik this should be still a simpler solution than SSR or transparency effects.
The atmospheric scattering plugin (from Blacksmith demo, at low settings) does add a lot in these types of landscapes : yes.. it’s a fog, but one that takes light direction into account, and a lot more natural looking than a simple fade to flat color.
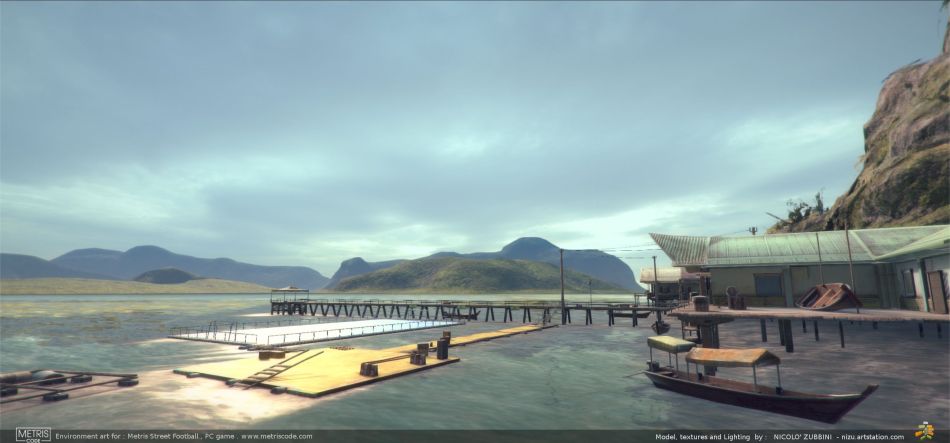
Something that proved important here : limiting the work to the camera angles actually used in game. This level is based on a real world location, something amazing about the photos of this floating Thai village is the variety of roofs .. but those are hardly visible in game and anyway not so important to need many variations.
he houses on the waterfront, in reality, also are each very different, so i made a few models, then added a shader with a color mask for wall paint areas and a vertex color channel to get unique colors on the foreground buildings.
Below images of the individual assets in substance and more screenshots :


M.A.V. – modular mech parts
M.A.V. : Modular Assault Vechicle is a indie PC game where you can build your mech and fight other pilots, developed by Bombdog Studios.
I worked on unwrapping, making hipoly detail models and texturing all the mech parts in the library, and modelled lowpolys for some.
Credits for the base design and lowpoly modelling goes to the main dev of the game Chad Mauldin (http://bombdogstudios.com/) and Valerio Fissolo collaborated on modelling hi and low poly for the heavy weapon set.
Image below is the full set of pieces done in the 1st round, but more mech parts and env. assets are coming.
That’s quite a library of pieces, but also quite consistent set of materials, and hipoly detail types, so a big part of the job was a good workflow, for the texturing the key was the standard Substance workflow of setting material ids on hipoly pieces, then applying to all sets a single smart material with color keys for the mat ids (approx. 30 materials in total), combinations of plastic, metal, rubber in 3 shades (light, mid , dark) and dull or shiny versions . The camo you see is dynamic, applied in game.
The overview screenshot is in the game engine, Unity 4, with a custom hardsurface shader. The assembled mech pictures on top and below are Marmoset viewer renders (using same spec/gloss maps as in game but with full pbr shading)
Below screenshots of various parts in Substance painter , with test camo patterns. Turns out, pink camo is the best way to judge if the mask is good 🙂 and how much camo paint the mech will acutally get.

The exploded placement is there to get correct occlusion while baking hipolys, and models were split in even smaller parts and named to get clean normal map bakes .. all then put back toghether and in place with some python script/macros to handle the repetitive bits.
The medals are game achievements i modelled and rendered as images.
The last screenshot is inside Blender showing a bit of the workflow.. mat id list, some low and hi poly pieces, the list of named (-hipo or -lopo) pieces and script with buttons to quickly export to substance or to final fbxs for unity .


Beach Arena
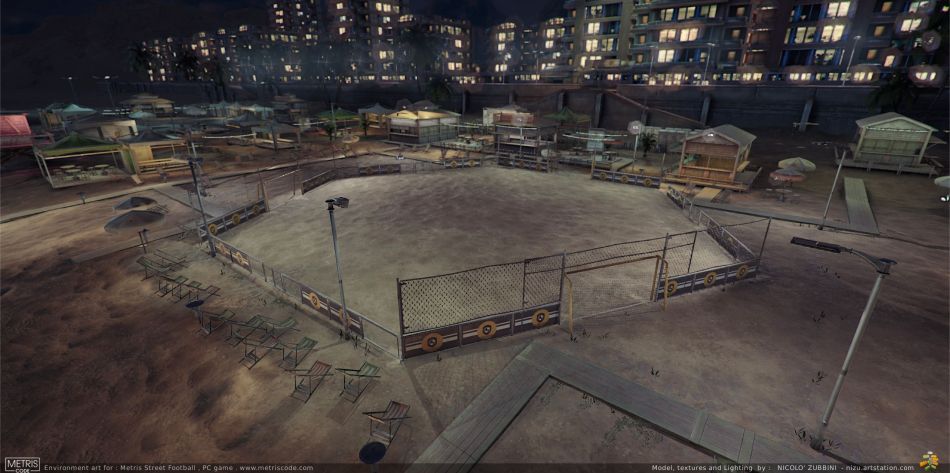 This is the 2nd arena from the Metris Street Football project. Like the next ones , this is based on real world locations, not precise ones, but generally popular and cool places where street soccer is played, like a city beach in Brazil.
This also proves i don’t only do postapocalyptic stuff! (and robots and sci-fi and ships…) Incredibly, the next 2 (Thai village and Venice ) even have bright sunny daylight ! 😀
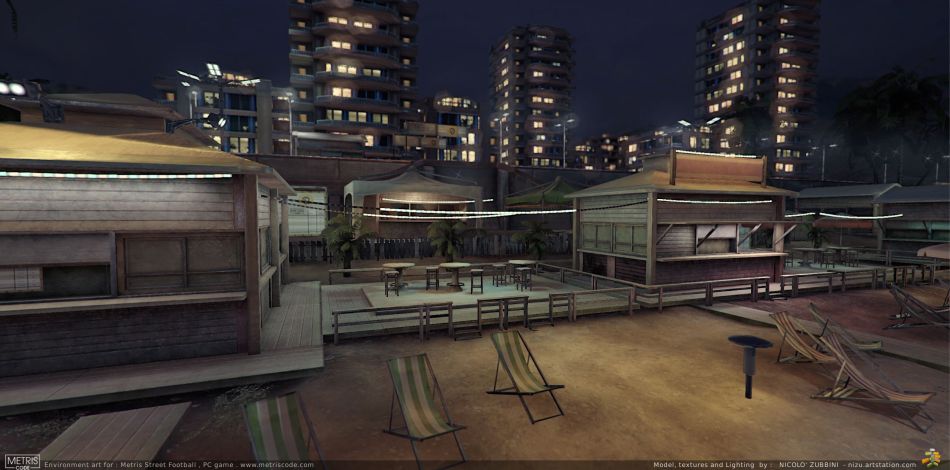
The view of a city beach has lots of elements, from the natural (sand , rocks and water, for which i used Substance designer for the most important tileables like sand, and for the 1st time Shader Forge for some additional blending and detail masks) to the architecture.
And the list there could have been nearly infinite, so the challenge was to narrow it down to the minimum (1 umbrella, 1 chair, 1 background tower and ‘sets’ of parts for wood huts and gazebos that allowed some different combinations.


Ship Arena – Metris street football
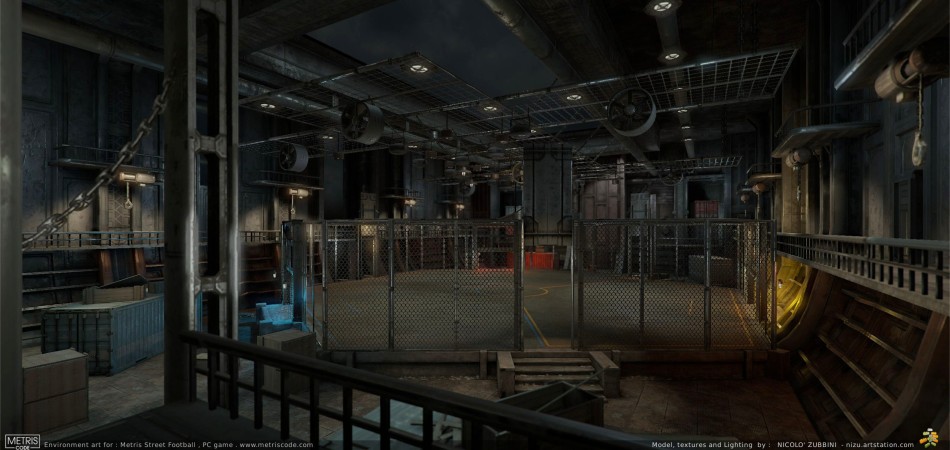
Lots to post from recent months ! Starting with this: environment art for PC game Metris street football for Metris Code.
“Ship Arena” (inspired by Terry Gilliam’s commercial from some years ago 😀 )
Modelled in Blender, textures in Substance, game engine and lighting in Unity.
I’ve done 3 more of these arenas (1 per month) recently, and i’ll be posting also another project i’ve done before that and that’s continuing now .
As for tech specs, it’s a indie pc game, uses Unity 5, so pbr materials and Enlighten (using a combo of low res realtime and more detailed baked GI ). Polycount was a bit more limited, aiming for 150-200k tris per level.
Textures budget is always a little less clear-cut : generally it’s all done with a 8-12 2k textures (knowing some might need ‘sacrificing’ to 1k) , 1-2 4k textures and 3-4 1k tileables and misc. textures, which runs fine on a modern pc even at 1440p but it’s anyway easily scalable for other hardware.
(Edit : 8-12 2k textures .. i mean sets of course ! so actually 3-4 images each , diff+opacity, pbr spec/gloss, normal and rarely emission or a detail mask )
Workflow has been pretty consistently Blender/Substance/Unity. The biggest new thing has been the export script i mentioned earlier to batch export quickly from blender to substance for hi-to-low bake and then to Unity for assembling the environment and lighting it.
This script i started is working ok as an internal tool for my work, but i’d honestly need a meditation week away from everything before it’s worth posting about as a general use tool. It doesn’t do anything fancy besides joining, renaming, repacking uvs without overlaps, fixing things like flipped normals on joining objects and rearranging ‘named’ uv layers in blender for the ‘numbered’ approach in unity …
But of course behind all the operations there’s a workflow and a logic structure : i.e. how i use object name suffix or parenting or scenes to organize all the copies of assets (for texturing and for in game use) and that’s very ‘personal’ (to my workflow and projects)
Right now, i have a bit of free time , so i could do that rethink and make sure any more python code i will write is time well spent, and hopefully that will make it more usable for others … Except 😀 , the priority is going to learning the Hard Ops modelling tool for Blender, which is going to be very useful for the other project i’ll post soon.


GoldenAge – Buildings details and decor


Models and textures for Rob Tuytel’s Golden Age project, These are hipolys for still rendering of VR panoramas.
I used the same workflow as for realtime game models, just using a bit more detail on the “lowpoly” (or better, in this case, ‘final’ model that is used in the scenes renders) so a few things like shutter hinges or thin frames are in the final lowpoly, but these aren’t much heavier than what’s used in a modern fps , the hipoly is still used, and baked to textures in Substance.


You can see these used in some amazing stills Rob has published lately on Artstation:
https://www.artstation.com/artwork/6RnZ0
More info below :
Rewind Env Art

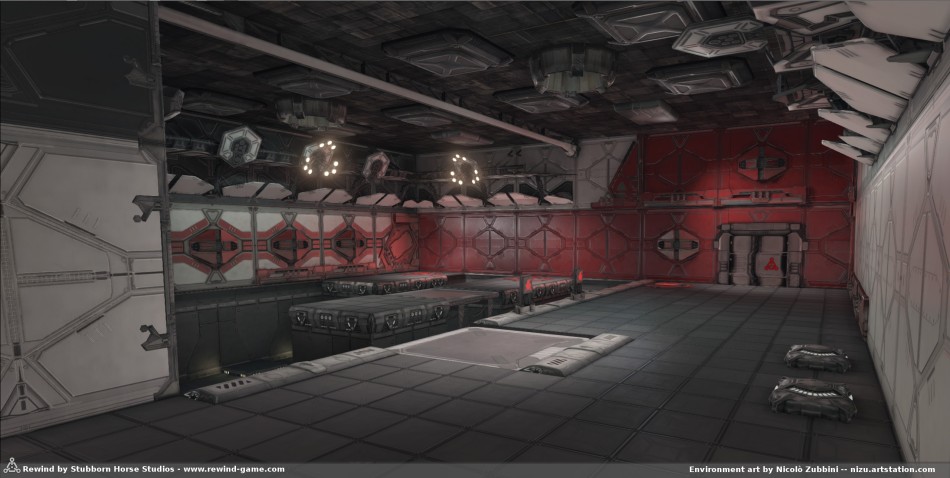
First round of images from my latest work : Environment art for the PC 1st person puzzle game “Rewind”, out on Steam on the 31st of March , by Stubborn Horse Studio, main dev. Rachel Cordone.
My part was to develop the full env art kit for the game, starting from a white box layout (very important in this case, being the puzzles dependent on the shapes and dimensions of rooms) For look-dev , i had a small kit of assets from the prototype version and guidelines on design and style, but i did concept work for most of these assets, and that’s a part i always greatly enjoy.
The project was started in 2012 in UDK, so what you see is not PBR shading (even if most in this post is Substance painter screenshots) , all assets were made with spec/gloss textures, but the engine has different calibration than today’s pbr , and the ‘image reflections’ system used is similar, but a precursor of now commonly used probes and ssr.
I also did the full level building of 2 maps out of 7 , of course ‘full’ being relative to env art, but including lightmap, collision and all the practical testing of your assets .. Those not so trivial things like making sure that your super fancy sci-fi corridor with hundred of pieces actually can tile seamlessy around a 90° curve :D. Kind of important, and just what i needed, since i recently worked more on single assets than levels, but you need to have experience in building levels anyway, to make best possible assets for level builders.
Being an indie game, this approach of making ‘construction blocks’ that could have maximum reuse and flexibility was fundamental, and on the same line, the outdoor natural elements are a perfect subject for that and helped to give some variation.
Check pics description for more info and another post is coming with game screenshots!


PART 2 : Levels Screenshots !


Cape Horn Ships

 Ahoy!, I’ve worked on 2 more ships for Rob Tuytel and the Golden Age project.
This time i got to do them from scratch : including lowpoly model from histrorical references, baking hi to low poly and texturing, all in Blender and Gimp.
The workflow was conceptually the same as previous ship , but this time i didn’t use DDO, just Blender ! i used the same kind of operations and filters based on processing the NM, AO and cavity maps , but all was done in blender nodes.
First step is making a cavity from normal (with compositor nodes) , step 2 is making generic base “dirtmaps” : one similar to ddo’s “acid” effect (for generic discoloration effects) , a classic one for crevices and areas that gather dust or rust , and similar one but for exposed thin edges (last 2 could be 1 but it’s easier and more accurate this way). I bake this equal for all the model , later use them differently based on the material of the individual piece.
Step 3 is assembling a material in cycles nodes : there i do the remaining blending and mixing to recreate dirt effects (i.e. i take the crevices map , blend it with a tileable rust texture, or add the acid effect mask just picking the right color and opacity for it ) to define different materials for pieces of the same model , i use a color id map (just like ddo workflow) that i baked previously during the hi to low bake (so materials are assigned to hipoly indipendently from lowpoly topology)


Baking was done as usual, relying mostly on splitting the model into many (30-40) pieces to avoid interferences with normals baking rather than using complex cages.
To manage the process and the many pairs of lo/hi objects i used an addon called “meltdown” great script ! maybe a bit over-scripted lots of features but very easy to break (if you have multiple scenes etc..is it really necessary to make a copy of everything to bake? ) i had just started writing the same on my own when i found it done already , and with plenty of features , i’ll need to read the python and investigate.
It’s a great thing about Blender that with such features/addons you have good chances of being able to contact directly the author and discuss it .. too bad i almost never get around to do that ! (on my list besides meltdown and texture atlas , fbx export and normal edits )


Last piece is the island , this is still wip (half day sculpting on a simple basemesh , with another half it could hold up for close ups).
I got the base mesh from Nasa SRTM project ( they have the whole earth as elevation maps for free, with a resolution of about 30m/pixel ) imported into blender (.HGT is a bitmap with georeferencing and height infos) , refined the coastline using open street maps contours, then sculpted the rest from photo.
Another useful tool for this was Meshlab : the quadric edge collapse decimation filter is better than blender’s (including planar decimation) and comparable to Zbrush decimation master. It got the 3 million tris sculpt down to 60k tris keeping uvs (in screenshot, with normal map)
So the ingame island is a static mesh, not using terrain system because it’s used for a flyover and background.
This was more efficient and detailed, i guess the rule is: terrain systems are for when you really need to walk on it , in any point with same detail , otherwise it’s easier to manually put detail where needed , in this case about 10x tris density in the front cliff compared to the back of the island)


Note this screenshot and the ones with all boats and the sea are from Unity 5 , the rest are rendered in Marmoset toolbag.
Unity 5 uses PBR too, so it’s about the same .. but i find Marmoset still a bit better, temporal AA is a lifesaver if you have thin stuff like rigging ropes!
In particular, low glossiness materials (like wood) seem to work a bit better in Marmoset .. i get the feeling they still show nice and correct highlights even when gloss and spec values are very low. While in Unity .. they look just diffuse, so you bump the values up a bit but then they risk looking metallic in light setups with strong highlights.

“The Golden Age” ship texturing


Ship texturing for The Golden Age VR :
- –hipoly sculpting , nm/ao bake to lowpoly in Blender.
- –dirt baking in DDO legacy.
- –Base texturing and final editing in Gimp.
- –Render in Marmoset (diff+spec+nm , constant gloss, pbr shading)
This december, i worked on texturing this ship model for The Golden Age VR ( http://www.degoudeneeuw3d.nl)
The project is a VR/museum/reconstruction of a Dutch city in all the splendor of the 17th century .
The lead env. artist for the project is Rob Tuytel (with whom i had the pleasure of working already on Project Mango).
It’s been a great chance to work on an interesting asset (Arrr : it’s a galleon ! how cool is that..at least , until you get to having to paint each piece of rigging and decor ! ), and technically fascinating too : while the project is -for now- developed in Unity 4, i’ve made spec maps and rendered this asset in Marmoset (and i’m currently digging into the general subject of PBR and next-gen shading)
W.I.P images and info (click on images to read descriptions) :


Kenshi : texturing game env assets


Long time without posting ! i know. At least, it’s because of constant work, and that means i have stuff to show !
(often the delay before being able to show something is up to 1-2 years., too bad but that’s how it works)
Here are screenshots of game environment texturing work i did earlier this year for 3D-Masala (who did modelling and supervision and doing a great job at that : reviewing and pointing me to a cleaner, more polished look )
http://www.lofigames.com/ (makers of the game Kenshi )


W.i.p shot of the dirt and edge wear maps painted in Blender (hand-refined, based on processing a cavity map + grunge tileables)
 W.i.p shot of detailing hipoly sculpts : metal plates done in Blender sculpt , baked to normals (as the concrete edges chipping in this case, in others concrete nm was handpainted, processed in gimp and converted to nm)

Branched path tracing and complex node trees tests (BConf13 slides)
Just back from Blender Conf 2013 .. so nice , as usual 😀
Below the slides i had prepared for the Tube project talk . Presentation was very short, so i only mentioned the tests i did on render performance of complex node trees in progressive path tracing vs. branched path tracing.
The 1st 10 slides are misc. w.i.p. images from Tube , the last ones show some comparisons between integrators , basically : branched being faster for easier cases (like absence of transmission and sss components and no dof or motion blur which require high AA ) and if setup correctly (trying to keep AA samples as low as possible)
Also the comparison is between complex node trees (= blending dirtmaps and tileables ‘live’ in the cycles material nodes) and ‘baked’ materials (= not lightbake, just ‘flattening’ the node tree to a single image per channel)
And the result is, baked shaders are much faster (circa. 150%) than complex nodetrees in progressive mode , while in branched the difference is only around 10%.
The test should be more extensive , with more data points ..but this seems to be the pattern. That’s relatively good news for shading artists wanting the flexibility and speed of setup of complex nodetrees but worried about their technical rendertime performance.
More to come on the subject, please post if you have any question.
EDIT : seems the slideshow gallery type doesn’t allow fullscreen , to see images fullsize (to read rendertimes!) click below (“more..”) to see expanded gallery with links to fullsize slides.
Final! (..final1, at least)

This is the final image of my personal still project. after some feedback i got on forums :
it was mentioned adding a character, .. but characters are an issue : being an env artist, that’s what i focus on . When i tried to have chars in my last personal still .. they weren’t at the same level as the hard-surface parts, and i don’t want people to be distracted by a bad skin shader or similar..
So i thought , if not chars .. at least some storytelling element would help , i came up with the idea of the cordon.. (like a crime scene, or a contagion zone .. ) it’s just a minor element but adds some plot , as well as just phyisically filling some space in the road area , and ,as for composition , it mirrors the curve of the arch above.
The other update is i’ve added displacement to the foreground bricks … being those so close up, makes a nice difference to have the detailed silhouette and better shading… (and it wasn’t much work , i just added some subd, a displace modifier an used weight paint to tweak intensity in different areas)
Latest feedback i got -just after publishing as final on BA, argh! 🙂 – was a mock-up for better composition and perspective. A great suggestion .. especially considering i’m still bothered that my last big personal project was precisely too simmetrical in composition . I think i’ll keep it this way and wrap up, but , i’ll remember that , check the mockup at CGS forums, quite interesting :
http://forums.cgsociety.org/showthread.php?p=7661133
Diffcol pass and wireframe :


Video ‘post mortem’ project analysis :

new still : time to wrap
Here’s the latest render of this env still . It’s time to wrap this up ! but i still want some feedback so i’m posting some material to share on forums :

Slideshow of all test renders from blockout to final tweaks :
Below, a screengrab showing which materials are based on dirtmaps (the ones in greyscale ) dirtmaps were 1st baked with the batchbake script , then painted over. The coloured parts are materials based on photos (of a ‘complete’ architectural piece like a wall panel or door) , except the sidewalk tiles based on sculpts done in Blender (and photos)

And Some passes from the latest render (AO and diff) :


New Still : few more bits and pieces
Can you spot the difference with previous update ? just kidding .. the tweaks are getting smaller , but still, at this point you want to patch up all the small imperfections or unfinished bits.
Some visible changes are to composition, mostly on color grading and exposure, including changing brightness of some material to get better overall colors (i.e. the background building bricks are brighter and of a cooler hue now )
I’ve refined the fog , using the “shaded” mode instead of “shadowed” , it’s slower but more realistic , the godrays are barely visible but more ‘physically’ plausible.
An interesting bit -even if not very visible- is that i’ve finally painted (photo-based) spec and bumpmaps for the green doors on the right and ‘diamond’ wall (on the left) : those parts are heavily based on photos (meaning the model is traced over an actual photo of the full wall or door )
Basing the model heavily on a photo of a complete architectural element definitely helps realism .. However i was bothered by the shading which looked a bit more “plain” and flat : it had bump and spec , but derived from the photo in cycles nodes, i spent about 30mins each in gimp with brushes and filters and i think they now integrate better with the rest.
In general , using good , complex photo textures was one of the aims of this still … i always relied more on tileables and complex shaders than good photos,(in the end, here too they’re just a few pieces).
But they have their pros .. like the door in the background : i think i wouldn’t have came up myself with such an interesting pattern in weathering (instead i just found a gorgeous looking hallway door in the city center.. and snapped a photo)

New still: road and other facades

About everything is textured ! and most is working ok, with some tweaks to do (the dirt color in the green building, the puddles water shader) i’m also planning to add some more mesh details and props (especially to the background building) , and rework some models (like the garden entrance).
I’ve also worked a bit on the lighting , trying to get a balance between dusk sunlight and artificial light.
Also, i’d really like to have some volumetric light and fog , so i guess i can’t refine the comp much (in contrast .. staturation and key/fill light ratio ..) before setting that up.
But, In general, .. this render gives a good idea of where this is going .. And, as usual, with my renders it has a peculiar “matte” look to it … and , more than that, the lighting isn’t very contrasted .. if you blur the image you quickly get to a flat grey .. But i also like that matte look ! you can read and see detail in shadow areas and it’s not too “cheap-cg-glossy” (when i say matte or glossy here , i don’t mean ‘materials’ but the ‘film’ ..the general look/lighting style )
This question is also related to something that i started figuring out during Mango.. that’s the “conflict” between lighting and textures : strong, rich, contrasted textures can get in the way of lighting , almost “overriding” the lighting itself …this image is a good test ground for this , at some point i’ll have to do the comp not starting from the final render but rebuilding it from passes , so i can try to balance influence of color passes and dir/indir light passes … let’s see..
Btw , thanks for the comments ! i’ve posted this only on the blog and social networks because so far i stuck to ‘my own plan’ and had lots to test anyway, but at some point i should try to get more crits and additional ideas ..
New still : modelling and texturing sidewalks

More texturing and detailing.. And, who knew ? making good looking sidewalks is hard !
In general, at this point, judging the results always gets confusing .. you have ‘finished’ pieces next to clay or basic materials ; there is light and comp , but it’s far from final ,etc.. So you just have to keep working ..and know where to suspend judgement ..
In the pic below the progression of sidewalks .. took quite a few iterations ! first i ‘slapped on’ some tileables ..and the result was so bad i realized this element would take some serious work .
So i dug into my library of tiles textures for the better ones -those with hand sculpted bumpmaps .
That wasn’t enough : just using bump looked horrible on the left sidewalks , so i added displacement .. But in the end i modelled and placed individual lowpoly tiles (with bump tex) : it takes time but it’s better looking and lighter on rendertime than displacement.
Next some tweaks to the sidewalk shape (for composition reasons.. ) and added some pebbles using particle scattering .
And finally tweaking the color so the sidewalks don’t stick out that much (they were definitely too bright)
Pfff.. that took a while 🙂 Next the road ..

New Still : Early texturing

In the pic. below the current state of this env. still , i’ve started texturing, even though there’s still quite a bit to do on the modelling side : detailing modelling for sure (wires, dirt and litter, pebbles, etc..) but possibly also some composition tweaks and other big changes.
What i wanted to check first , was the foreground arch .. i wasn’t sure if i could get away with detailing it only by texturing or if it needed more mesh details .. seems it worked, i’ll add some stuff, but just ‘pasted’ on top , not changing the base mesh..

And the textured view :
As usual it’s just b/w dirtmaps , no full color textures , all the rest is done with vertcol , tileables and lots of nodes.

One other thing i wanted to test early was the 3 steps stencil node group i used often (not so much lately) , here i’m using V3 (you can see the params below , and it’s available in the resources page downloads )
The screenshot below shows on the right the handpainted dirtmap and on the left the viewport shows the effect of ‘noise’ on the dirtmap .. of course the black/grey/white are replaced in the final render by tileable photo textures , but the noise overlay does an important job : the handpainted dirtmap is quite simple , blobby and blurry . The noise overlay adds ‘character’ (here a peeling plaster pattern) without spending too much time detailing with complex brushes each specific dirtmap..

And the diffuse color channel :
One thing i’ve learnt better in the last months (especially in the work on Tube) is that generally speaking is best to have a quite flat dif-col : don’t over-shade it .
E.g. in tiles and bricks textures don’t shade/darken the grouts at all , if you have a bumpmap, it will do the job . Darkening the grouts in the diffuse will only over-do the effect.

And of course , all is stil w.i.p. and there’s no comp at all for now (only some AO overlay)
New still : Blockout 2 and detailing

Proceding with modelling this new portfolio still (..eerh, no name for it yet..)
Since the 1st post, i did only 1 blockout tweak for composition: rotating the background building so it’s not parallel to camera , that helped a lot, making it more real-world plausible and also to avoid that building becoming too much of a focal point of the scene .. the idea would be for the attention of the viewer to move around the environment and around 3-4 focal points not getting stuck on a single thing.
So i started detailing . From experience, i think the delicate thing at this point is to stick to real world references , not to work too much from memory and intuition , that might reduce overall realism.
However, i also feel that the most ‘advanced’ skill of a modeller is just that : not just being able to copy stuff for which you have a full and perfect reference .. but to make models just like you want them or need them for other reasons (good compostion, visual impact, storytelling needs, originality in look and style..) , then spot the points that aren’t convincing and improve them..
So i went on with detailing without sticking too much to exact refs. because it’s good exercise in a personal project. Then, some of these parts might still be discarded if i find some ref. piece that could replace an element with something a lot more interesting and convincing.
Also , i’ll start texturing some pieces next , just to test some new techniques (..would be more efficient to wait a bit more, but again , it’s a personal study..)
Current status :

Some previous steps :


