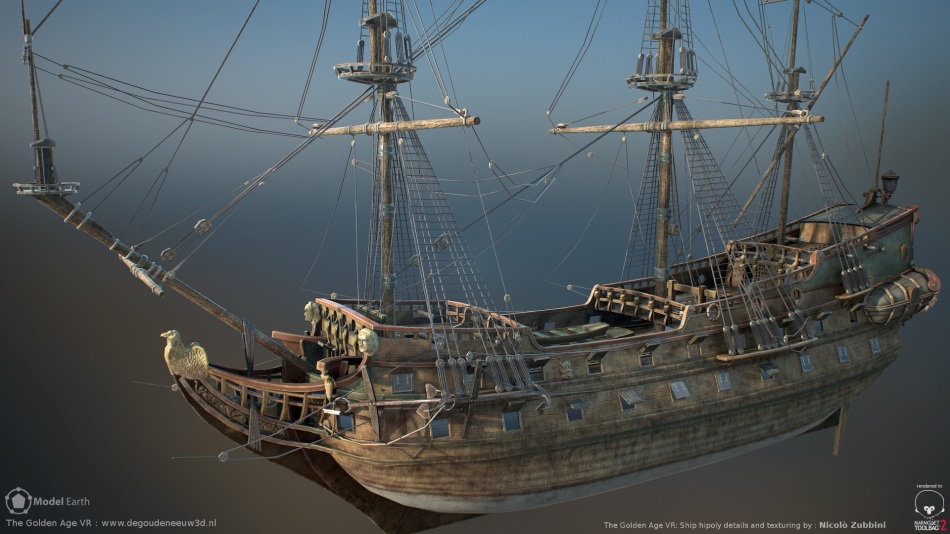
“The Golden Age” ship texturing
Ship texturing for The Golden Age VR :
- –hipoly sculpting , nm/ao bake to lowpoly in Blender.
- –dirt baking in DDO legacy.
- –Base texturing and final editing in Gimp.
- –Render in Marmoset (diff+spec+nm , constant gloss, pbr shading)
This december, i worked on texturing this ship model for The Golden Age VR ( http://www.degoudeneeuw3d.nl)
The project is a VR/museum/reconstruction of a Dutch city in all the splendor of the 17th century .
The lead env. artist for the project is Rob Tuytel (with whom i had the pleasure of working already on Project Mango).
It’s been a great chance to work on an interesting asset (Arrr : it’s a galleon ! how cool is that..at least , until you get to having to paint each piece of rigging and decor ! ), and technically fascinating too : while the project is -for now- developed in Unity 4, i’ve made spec maps and rendered this asset in Marmoset (and i’m currently digging into the general subject of PBR and next-gen shading)
This slideshow requires JavaScript.
W.I.P images and info (click on images to read descriptions) :

For most pieces , “Hipoly” here meant just some additional bevel and details , but for statues and other decor , hipoly was sculpted in Blender.For this bas-relief in the back of the ship, i started from vector art , processed in gimp (mostly bilateral blurs and reducing contrast on small details) , then loaded that as displacement to refine by sculpting (..to a point .. you can still spot some ‘errors’ , due to this not being a full hand-made sculpt , but based on filters on a photo .. Still, since the final output is a normalmap , this was a good balance of quality vs time.

sample of material ID maps used in Gimp to mask materials, these , like AO and NM were also baked in Blender. In DDO i would not load mat-ids, i baked dirts for the whole model ( with alpha). Then in Gimp i mixed them with base maps and assigned them to different materials/parts of model. In screenshot you also see a very simple ui-less script i made to batch bake many hipoly chunks to lowpoly. Why “many chunks” ? it’s a simple but imho very important secret for game assets NM baking : when you have a fairly complex object to bake, just break it into simpler objects and bake one by one (each hipoly to its own lowpoly ) to avoid interference. It’s certainly not clever or hi-tech , but it’s reliable .. and then you only need to automatize the batch to repeat it quickly.

This screenshot is from an addon script i’m working on for Blender. Not used for this project , but made later to automatize the same workflow : lots of hipoly chunks to project to corresponding lowpoly pieces .. Hence the script to process this list of hi-to-low pairs , for NM. AO and displacement. I found out Displacement maps are handy ( similarly to NM) for generating semi-procedural texturing like in DDO . The cubes in this viewport have an “acid” like dirt done using these bakes in Gimp and trying to match the results of DDO manually in gimp. Right now , i’m still deciding : it’s certainly useful to be able to understand and do manually this stuff for better control .. but what’s more important ? the control i get doing it manually or the speed you get from DDO being automatized ? depends , if it’s really necessary to use many dozens of ‘dirt effects’ on every material, then DDO is faster … but maybe doing just a few selected and significant dirts is “cleaner” and more effective ? (more about this question soon !)
This entry was posted on January 5, 2015 by nizuvault. It was filed under Uncategorized .


